Peripheral High/Low Level Initialization
Peripheral High Level Initialization
1) Define a handle variable to handle the required peripheral as a global variable in the program
- Base address of peripherals → stm32f446xx.h
2) Link as well as initialize the handle variable
While working with STM32 HAL layer, during parameter initialization always use the macros/values mentioned under “@ref”
huart2.Instance = USART2;
huart2.Init.BaudRate = 115200;
huart2.Init.WordLength = UART_WORDLENGTH_8B;
huart2.Init.StopBits = UART_STOPBITS_1;
huart2.Init.Parity = UART_PARITY_NONE;
huart2.Init.HwFlowCtl = UART_HWCONTROL_NONE;
huart2.Init.Mode = UART_MODE_TX_RX;
3) Use the init. API of the peripheral to initialize the peripheral
	if (HAL_UART_Init(&huart2) != HAL_OK)
	{
		Error_handler();
	}
Peripheral Low Level Initialization
- void HAL_UART_Init : stm32f4xx_hal_uart.c (already implemented)
- call ⇒ week__ void HAL_UART_MspInit : stm32f4xx_hal_uart.c → msp.c (user implement)
- When the peripheral is not working as expected, then this function should be the first debug spot
- Most people do mistakes in configuring the low level peripheral settings
1) Enable the required peripheral clock
- Use standardized macros even by the cub layer
- In STM32 different macros name start from “_HAL”, followed by “peripheral name”
- __HAL_RCC_USART2_CLK_ENABLE();
- __HAL_RCC_GPIOA_CLK_ENABLE();
2) Do pin muxing configurations
Pin muxing configuration 은 micro-controller 마다 다름
- UART needs 2 pins for communication (Tx pin, Rx pin)
- Use a GPIO each for Tx and Rx.
- Before using GPIOs → configure their mode as alternate functionality mode(=UART)
- GPIO engine에게 UART용도로 사용할 것임을 알려야 함
Flow control을 사용하면 Tx, Rx, RTS, CTS로 총 4개의 핀을 사용하지만, 지금은 Tx, Rx 두개만 사용
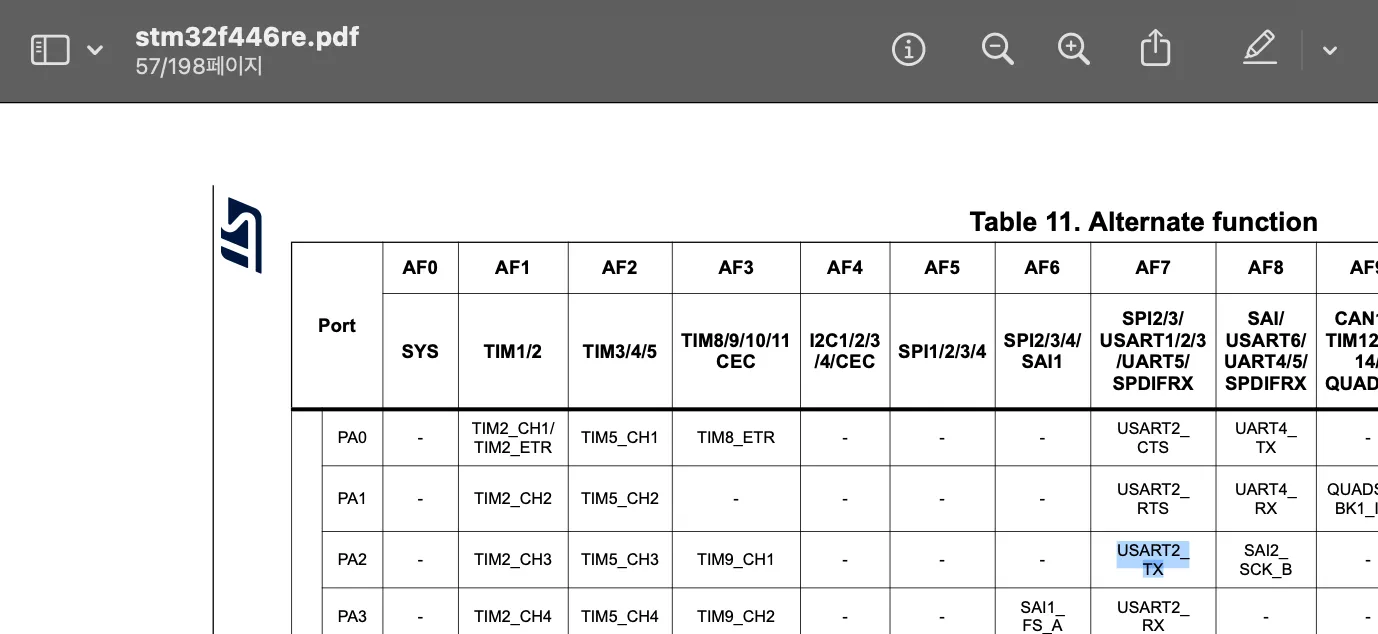
- PA2 : GPIO 포트 A의 2번 핀
- AF7 : USART TX 기능을 가질 수 있음
⇒ PA2핀을 AF7모드로 설정하면 이 민이 USART2 Tx(송신) 역할을 하게 됨
- stm32f4xx_hal_gpio.c ⇒ HAL_GPIO_Init(GPIO_TypeDef *GPIOx, GPIO_InitTypeDef *GPIO_Init)
- GPIO_TypeDef *GPIOx : GPIO base address
- GPIO_InitTypeDef *GPIO_Init : GPIO init structure
- GPIO handle structure 은 필요하지 않음
void HAL_UART_MspInit(UART_HandleTypeDef *huart)
{
	GPIO_InitTypeDef gpio_uart;

// 2) Do pin muxing configurations
	gpio_uart.Pin = GPIO_PIN_2; // UART2_Tx
	gpio_uart.Mode = GPIO_MODE_AF_PP;
	gpio_uart.Pull = GPIO_PULLUP;
	gpio_uart.Speed = GPIO_SPEED_FREQ_LOW;
	gpio_uart.Alternate = GPIO_AF7_USART2;
	HAL_GPIO_Init(GPIOA, &gpio_uart);

	gpio_uart.Pin = GPIO_PIN_3; // UART2_Rx
	gpio_uart.Alternate = GPIO_AF7_USART2;
}- Communication lines peripheral(UART, SPI, I2C) 에서는 주로 pulled-up 사용 (UART의 CTS/RTS line은 communication이 아니라 signaling line에 해당)
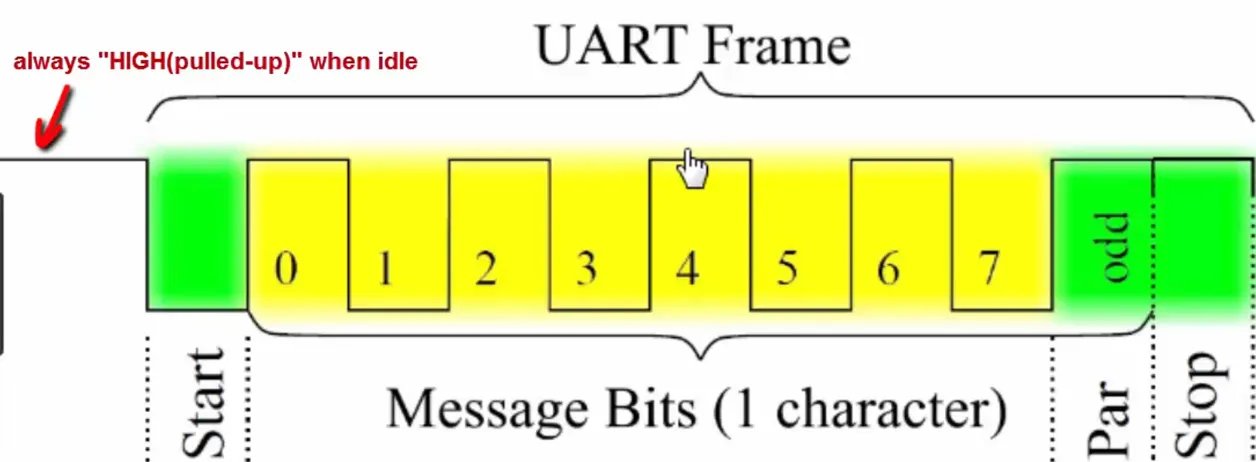
physical pin의 UART frame transaction을 보면 line이 pulled high상태일 때 no communication 상태임
3) Enable the peripheral IRQ in the NVIC (optional) and set the priority as per your application need
(interrupt mode로 peripheral을 사용할 경우 필요한 과정, 필수적이지 않음)
interrupts call → peripheral이 asynchronous event 발생
이를 위해서는 관련한 IRQ(Interrupt Request Number) 를 활성화시켜야 함
그럼 누가 interrupt를 관리? → NVIC engine
→ NVIC은 프로세서 특화이므로 cortex.c 확인
void HAL_UART_MspInit(UART_HandleTypeDef *huart)
{
// 3) Enable the peripheral IRQ in the NVIC
	HAL_NVIC_EnableIRQ(USART2_IRQn);
	HAL_NVIC_SetPriority(USART2_IRQn, 15, 0);
}